How to Install WordPress Plugins

You can easily install any of the thousands of plugins you want from your WordPress admin panel. Customizing your WordPress website, adding different features, or increasing your site’s management and performance is possible. If you want to know how to install WordPress plugins for your website, there are 3 different ways to download them.
WordPress Plugins from the Official Plugins Directory
If you want to install useful WordPress plugins, the easiest way to install a WordPress plugin is to install it using the “Search Plugins” section. However, this option has the drawback that the plugin is in the WordPress directory and is limited to free plugins. In addition to this, when installing WordPress plugins this way, the plugins you install must be registered on wordpress.org because we will do this installation through the dashboard located under the plugins area.
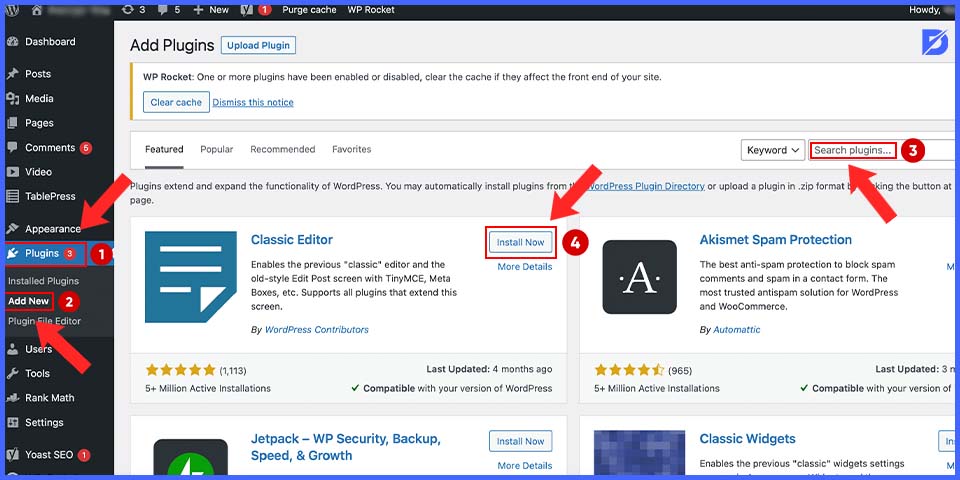
- First of all, go to the Plugins.
- Then, visit the “Plugins” -> “Add New Page”. Next, search for plugins by entering the plugin name or feature you are looking for. You can choose the plugin that suits you best.
- Find the best application, and click on it.
- The plugin box will appear.

- Click the “Install Now” button next to it.
- WordPress downloads and installs plugins.
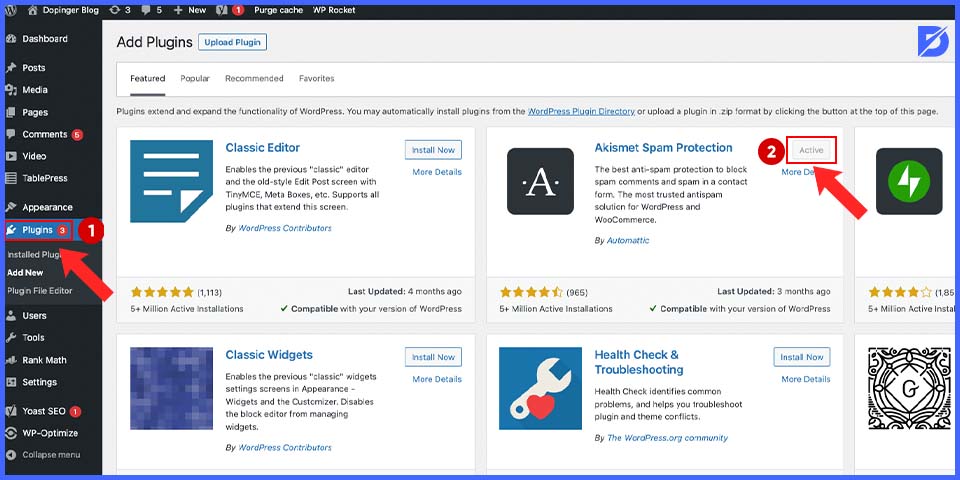
- After that, you will see that the “Install Now” button has changed to an “Activate” button.
- You can install the WordPress plugin on your website, but the plugin will only work if you click the “Activate” button.
- Click the “Activate” button to use this plugin on your WordPress site.
Most plugins, especially large ones, have an options menu on the left side of your dashboard. For instance, the Rank Math plugin has an “SEO Analysis” menu that lets you dive into the plugin’s settings.
Install WordPress Plugins Manually
Paid WordPress themes are not registered in the WordPress.org plugin database. Only free WordPress plugins are registered on wordpress.org. For instance, if the developer’s site has the latest version of the plugin or if you installed a premium plugin directly from the developer’s site.
Please note that downloading plugins directly from the developer’s website carries some risk.ins
Plugins in the WordPress repository are checked to a fairly safe level. You do not have this protection if you download the plugin directly from the developer’s website.
Downloading only from the most trusted websites will be the best choice. So, you should scan all files with antivirus software before uploading.
Therefore, this and his third method can only install WordPress plugins for paid third-party plugins.

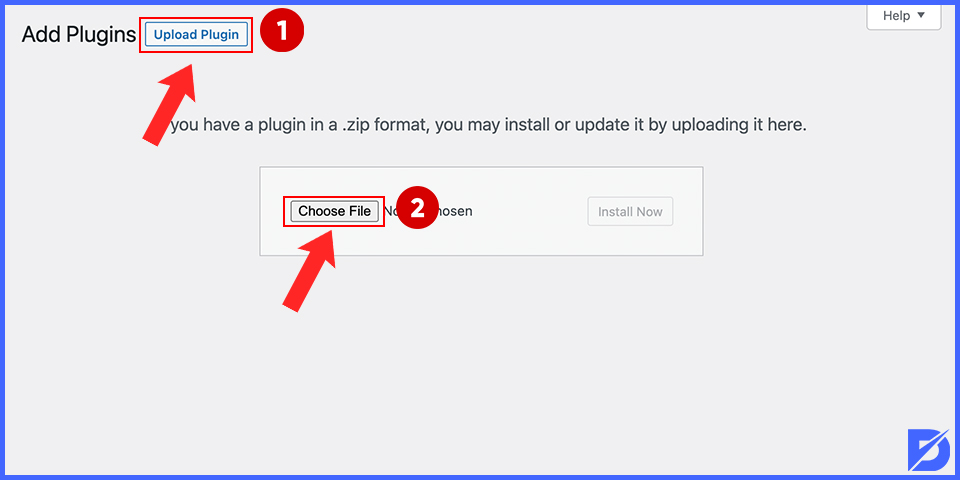
- First of all, download a WordPress plugin to install on your website. This plugin must be in ‘ZIP format’. Then go to “Plugins” -> “Upload Plugin”.
- A screen will appear in front of you. Click on “Choose File” from this screen, select the downloaded to the computer in zip format, and click the “Download Now” button.
- Then, the plugin installation process in WordPress will be shown step by step. After completing the WordPress plugin installation process, activate the plugin by clicking the “Activate Plugin” button on the final step screen.
- You can access the installed plugin management window as follows. Firstly, click on the “Plugins” -> and “Installed Plugins” tabs.
WordPress Plugin Installation with FTP
Sometimes, WordPress hosting providers have file limits that restrict you from installing plugins from the admin panel, or the large size of the .zip file prevents this installation from the admin panel.
In particular, some hosting companies can set file upload limits from the WordPress admin panel for the WordPress infrastructure. In such cases, during the WordPress plugin installation process, you may receive a warning about a “failed WordPress plugin installation”. At this point, using FTP to install the plugin is the best option if you want to add the WordPress plugin using another method.
- First, download the WordPress plugin you want to install on your site in .zip format and transfer it as a file to your computer using the “Export File” option.
- Once the export process is complete, the plugin file name will be the same as the .zip file, which will be uploaded to your site server via FTP.
- Then download and install “File Zilla”. When you open File Zilla, the program asks for server, username, and password information to connect your computer and the site server.
- After the connection between your computer and your site server is established, the right side of the screen will be your server, and the left side will be your computer.
Follow the path “Public_html” -> “wp-content” -> “plugins” on the right side of the screen to navigate to the file directory where the plugin is installed. You can find the plugin file you want to add to your website on the left, right-click it, and click the “Upload” button. After that, the WordPress plugin installation process will be completed in a few seconds.
How to Complete the Installing Process
To activate the added plugin, it is necessary to go to “Plugins” -> “Installed Plugins” and activate the plugin.

You can access the installed plugin management window as follows: Can be accessed by clicking the Settings or General Settings button just below the installed plugin name on the “Plugins” -> “Installed Plugins” tab.
Conclusion of How to Install WordPress Plugins
In this article, we explained some install methods for WordPress Plugins. These ways will increase your speed in building a practical website. Hopefully, we were able to help.
The post How to Install WordPress Plugins appeared first on Dopinger Blog.
The post How to Install WordPress Plugins is republished from Dopinger Blog
Yorumlar
Yorum Gönder