How to Insert Textbox In Google Docs?

The text box is an extraordinary and powerful approach to outwardly arrange your thoughts or separate a bunch of text on a page. Google does not make adding text boxes to Google Docs as express likewise with other word handling programs. Luckily, you can use a couple of simple techniques to add a book box to Google Docs. Text boxes let you add text or pictures inside them. At that point, move the cases around, between, or inside reports. The means in this article will tell you the best way to insert a textbox to Google Docs.
- Open your document from Google Drive.
- Click wherein the document you want the text box.
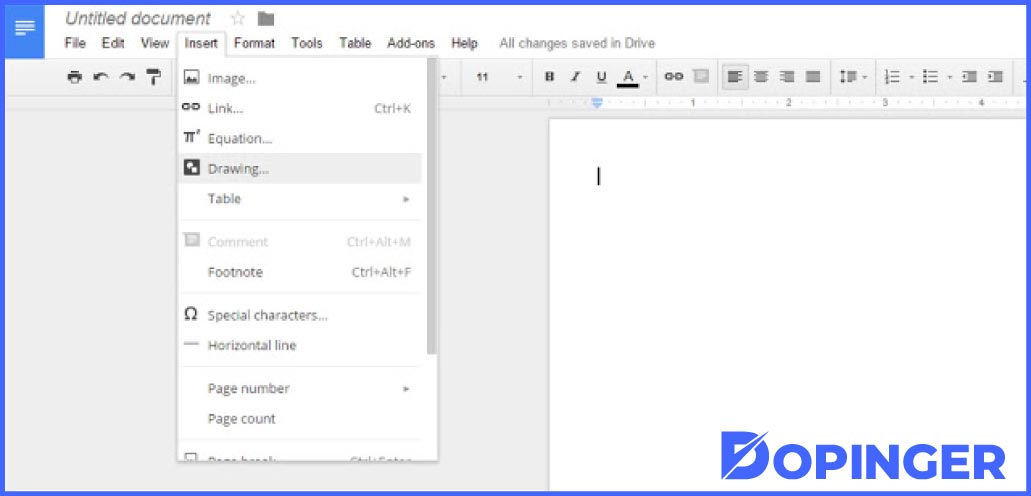
- Select the Insert tab at the top of the window.
- Select the drawing option, and then click New.
- Click the Text box symbol on the toolbar.
- Draw the text box on the canvas.
Type to add text to the text box, and then click Save and Close.
While much of the content you add to a Google Docs document will be done by simply clicking on the composition and typing, you may have other needs.
Specific document layouts can only be achieved by positioning content so that it is not achievable by standard document editing. Fortunately, you can use text boxes in Google Docs to do this.
But adding a text box to Google Docs isn’t as simple as it is to programs like Microsoft Word, and you need to use an additional tool to insert a text box into a Google Docs document.
In the following three different narratives, we explain what you need to do.
3 Different Techniques for Adding Text Boxes to Google Docs
The steps in this article were taken in the Google Chrome web browser, but it will also work in other desktop browsers such as Firefox or Edge.
Insert Text Box In Google Docs Using Drawing Tool
Here are the steps:
- Open Google Drive at https://ift.tt/wZv67B and open the text box document.
- Click the point in the document where you want to add the text box.
- Select the Insert tab at the top of the window.
- Select the drawing option, then click New.
- Click the Text Box button in the toolbar above the canvas.
- Click and hold on the canvas, then drag the mouse to draw the text box. Release the mouse button when finished.
- Enter your content in the text box, then click Save and Close when you’re done.
You can later edit the text box by double-clicking it in the document or clicking it once and then selecting the Edit option.
The Most Effective Method to Use Shapes To Create and Insert a Text Box in Google Docs
You can add various squares, rectangles, diagrams, and many more shapes for the documents you create. With Google Docs, it authorizes you to add different text and conditions, just like a text box, and decorate them with backgrounds.
Select Insert Design, then New, then click Control Shapes.
Click on the shapes section to select the shape you want to use.
Click once on the drawing area with the help of your mouse and drag it to create the shape you choose. To add text to the form, you select, double click on any point with your mouse, and type your text.
You can also add various arrow figures, lines and callouts, and even equation symbols in mathematics from this section. When you have completed your drawing, first click Save and then Close to add it to the document.
To make edits on the shape you have created, first, select the form, then click the Edit section. You can delete the way you have created by pressing the Delete or BackSpace key on your keyboard.
Also, with ToolBox, you can add images to any area, color assignments, add lines, and many more functions.
To rearrange text boxes or shapes, right-click the text box section or the created form in the Drawing dialogue box, move your cursor to the command section and click on command options.
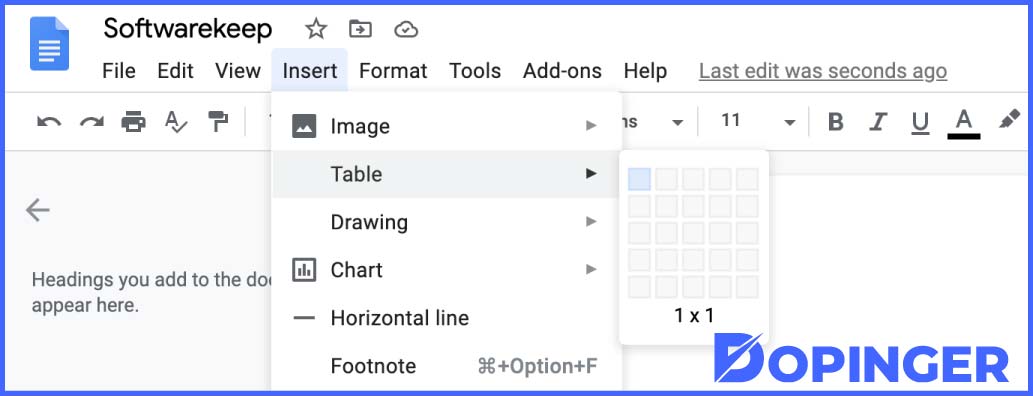
The most effective method to Insert a Text Box in Google Docs Using a Single Table Cell
You can add and edit a single-cell table with one row and one column with the help of a text box in Google Docs. To do this;
Click Add from the top section, then click the Table section. Then click on a single cell with a column and a row (1 × 1).
When you do this, a single cell table will appear in your document. You can adjust the width and length of the text box.
You can change the font, color, and size to provide a more effective and professional look in your text.
The most effective method to embed pictures into a book box or shape in Google Docs
In Google Documents, you can customize your text box and the shape you have created by adding various images, or you can add text on the image if you wish.
To add an image to your text box or shape:
Click the shape or text box, then click the Edit section to switch to the Drawing tool.
Click the image of the symbol on the tab menu.
You can add images by uploading them from your computer, or you can add pictures via an internet connection (URL). Click the Select section to add the photo.
The text adding box will appear at the top of the image or shape you have added. Select the text box you made. At that point, select Edit from the menu below to return to the drawing area.
FAQs on How to Insert Textbox In Google Docs
Text boxes let you add text or pictures inside them. At that point, move the cases around, between, or inside reports.
While much of the content you add to a Google Docs document will be done by simply clicking on the composition and typing, you may have other needs.
But adding a Textbox to Google Docs isn’t as simple as it is to programs like Microsoft Word, and you need to use an additional tool to insert a text box into a Google Docs document.
You can later edit the text box by double-clicking it in the document or clicking it once and then selecting the Edit option.
You can add images by uploading them from your computer, or you can add pictures via an internet connection (URL). Click the Select section to add the photo.
Conclusion of How to Insert Textbox In Google Docs
In this article, we explained how you can insert Textbox in Google Docs. Hopefully, we were able to help.
The post How to Insert Textbox In Google Docs? is republished from Dopinger Blog


Yorumlar
Yorum Gönder